


This is the second part in our series of blog posts looking into the technology behind the LSAO (Large Scale Ambient Occlusion) system that we developed for Homefront: The Revolution. If you haven't already read the first part we recommend that you do, it can be accessed here.
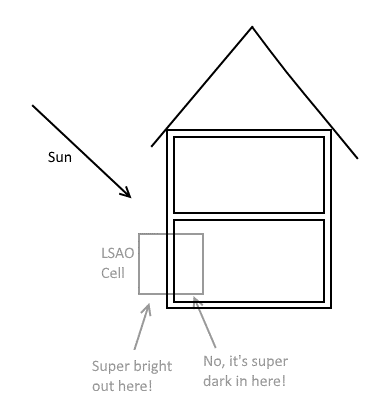
One of the big changes in the AAA games industry at the time that Homefront: The Revolution was in development was the transition to Physically Based Rendering (PBR). In a nutshell, this means that the shading is based on what is physically correct instead of just what looks right. This meant our interiors were really dark and the sunlight was really bright. As a result, any computing errors, and particularly light leaks into interiors were super noticeable.
Thin Wall Problems
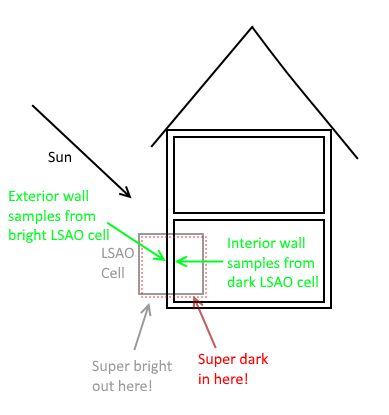
The cell size for the LSAO data had to be somewhat reasonable to keep the memory usage sensible (especially because each cell was 6 bytes). Although we supported cells that went down to 25cm spacing, that wasn't very typical. A meter or two spacing was more usual which meant a cell would almost always span the outside and inside of a wall.
No value of the cell would work for both the interior and the outside. First, we tried a cheap mitigation for this which was to just push the sample point along the world normal of the surface we were sampling from. This improved things, but was not a perfect fix.
Light Leaks
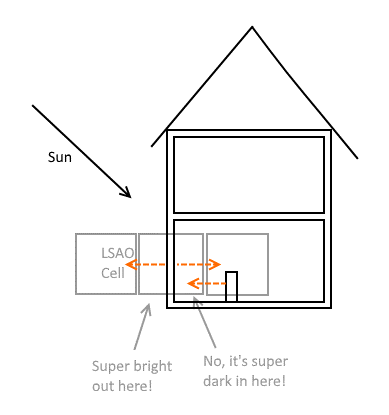
A related problem was light leaks. We had a lot of basements in Homefront: The Revolution and they were really really dark as far as the ambient light level was concerned. They were so dark we had to store our ambient results as the fourth root so that our 8-bit values would have enough resolution to express a reasonable range of precision in our dark interiors.
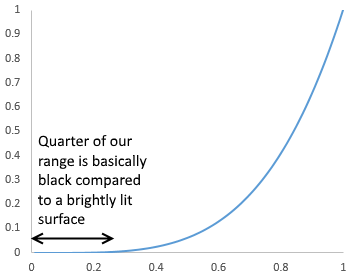
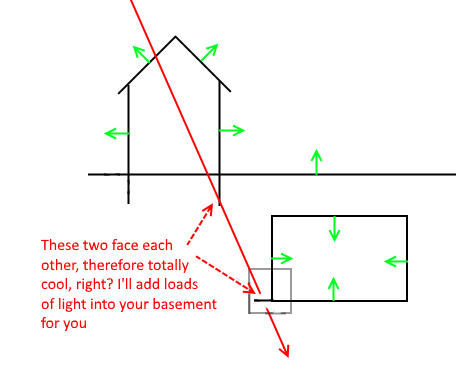
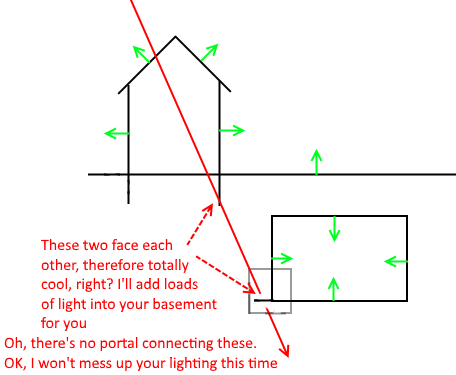
A lot of our usable range was for really dark places. Any tiny light leak from the exterior had a huge effect. Light leaking should be impossible due to the system ignoring results unless two surfaces were to face each other. Unfortunately, even the digital world isn't always perfect.
VisAreas to the Rescue
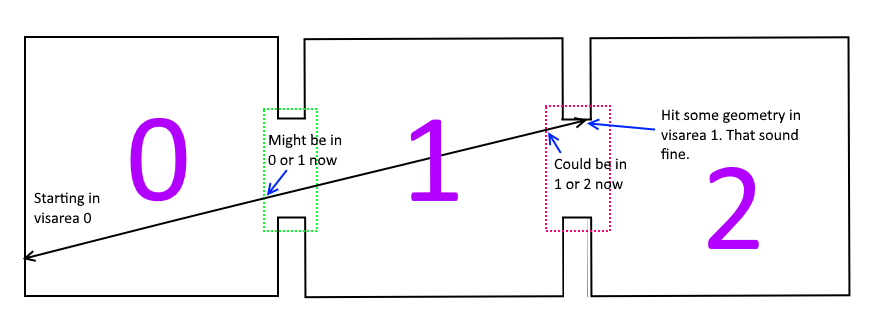
Luckily for us, CryEngine had the concept of VisAreas and Portals. This was mainly to improve visibility calculation performance. Every object would exist in a VisArea and could only be seen if the camera was within the same VisArea or if the camera could see the object through a portal from a second connecting VisArea. The best thing about them was that the artists set them up for this reason but they could also be used to fix all of our LSAO problems.
Each surface knowing what VisArea it was in allowed us to have overlapping cells and use the VisArea ID to lookup up into the right cells. Exterior cells will only affect the exterior; cells for interior X would only affect interior X. Therefore both could have the correct value without interfering with each other.
And as we have portals already, we can also only let light pass through portals which removes all the leaks!
Implementation
For the generator to achieve the correct results, we needed the linked list to know what VisArea each bit of geometry was in. Unfortunately, our linked list entries were already full...
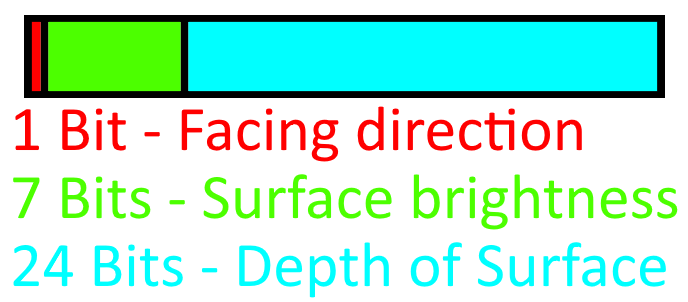
We couldn't afford to make the entry bigger as the link list storage requirements were already huge (>1Gb). So we introduced markers. They would mark that all the following entries in the linked list belonged to a certain VisArea. To distinguish markers from regular geometry we stole a tiny amount of brightness precision. A brightness of 127 specified a VisArea marker so normal brightness now could only go up to 126 (max value storable in 7 bits minus 1). The depth wasn’t needed for markers so was repurposed for the VisArea ID. When we traversed the list, we just needed to keep track of what marker we last passed to work out what VisArea the current geometry belonged to.
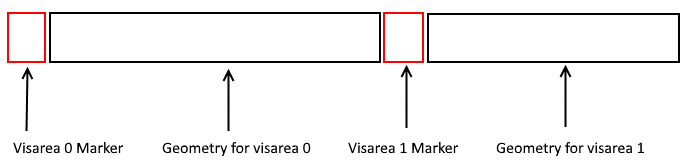
Finally, we needed portals in there somewhere too. Again, we stole another tiny amount of brightness precision for a portal identifier. However, this time we needed to store the depth. So instead we had two entries in the linked list; one to say it was a portal, and the next to be the ID's of the two VisAreas that this portal connected to.
The new process was to find two bits of geometry facing each other. If the VisAreas matched, we would carry on as before. Otherwise we'd try to find portals between the pair that'd connect the two. The portals were all stored together so this search was completed using only on a tiny bit of the buffer. Finding a route could get complicated if there were multiple portals involved and exacerbated somewhat by CryEngine portals being areas instead of planes. The solution was to remember the two VisAreas we could be in when we first entered a portal.
Using this process we were able to create realistically dark interiors with no leaks!
We've almost covered everything to do with LSAO generation now but there's a few loose ends that'll be in the final part of this series.
About the author. Charlie Cole is Principal Core Technology Programmer at Dambuster Studios and has participated in all of the studio's projects since TimeSplitters: Future Perfect.